Egg penguin pattern
A simple one-piece body with a bold shape. Amigurumi, about 14 cm tall.
Difficulty: 4 out of 5. Hard: takes a long time, several techniques, parts to join.
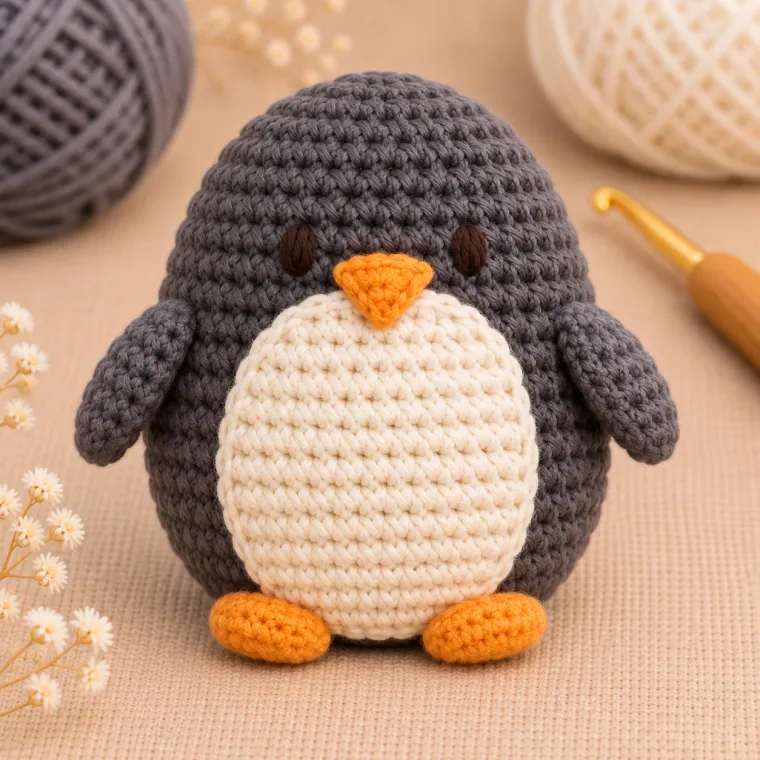
Sizes may vary with the materials you use. We suggest making a small sample first.
- Height
- 14 cm
- Gauge
- 21 stitches and 23 rows in 10 cm
- Stitches
- 2544
You will need
- Worsted (4) yarn in the colours listed
- 3.5 mm crochet hook, or the size that matches your swatch
- Polyester fibre stuffing, yarn needle, stitch marker
- Pins, to try out where things go
- A: Dark grey
- B: Cream
- C: Orange
- D: Dark brown
Before you start
- Make a small test piece first. If it comes out larger than the gauge, try a smaller hook. If it comes out smaller, try a larger hook.
- A number in brackets at the end of a line, such as (24), is how many stitches you should have. Count them before moving on.
- Made a mistake? Pull the yarn gently to undo the stitches back to the mistake, then carry on from there.
- Toys are worked in a spiral, so rounds are not joined. Put a stitch marker in the first stitch of the round. When you come back to the marked stitch, the round is done: take the marker out, work that stitch, and put the marker in the stitch you just made. That is the first stitch of the new round.
- Keep your stitches tight so the stuffing does not show. A smaller hook than the yarn label suggests helps with this.
- Add stuffing a little at a time, and shape it with your fingers before closing a part.
- The eyes are embroidered before the body is closed. There are no plastic eyes or accessories.
Abbreviations
| MR | magic ring. Make a loop with the yarn tail, work the first stitches into it, then pull the tail to close the hole. |
|---|---|
| sc | single crochet. Put the hook in a stitch, wrap the yarn, pull up a loop (2 loops on hook), wrap again and pull through both. |
| inc | 2 sc in the same stitch. One stitch becomes two. |
| dec | invisible decrease: sc 2 together through front loops. Two stitches become one. |
Body
Colour A (Dark grey). The head and body are one piece. Start at the top of the penguin and work down in a spiral. Stop after round 32 and embroider the eyes while you can still reach inside.
| Rnd 1 | 6 sc in MR | (6) |
|---|---|---|
| Rnd 2 | inc × 6 | (12) |
| Rnd 3 | (1 sc, inc) × 6 | (18) |
| Rnd 4 | (2 sc, inc) × 6 | (24) |
| Rnd 5 | 1 sc, inc, (3 sc, inc) × 5, 2 sc | (30) |
| Rnd 6 | sc around | (30) |
| Rnd 7 | 2 sc, inc, (4 sc, inc) × 5, 2 sc | (36) |
| Rnd 8 | (5 sc, inc) × 6 | (42) |
| Rnd 9 | sc around | (42) |
| Rnd 10 | (6 sc, inc) × 6 | (48) |
| Rnd 11 | 3 sc, inc, (7 sc, inc) × 5, 4 sc | (54) |
| Rnds 12–13 | sc around | (54) |
| Rnd 14 | (8 sc, inc) × 6 | (60) |
| Rnds 15–16 | sc around | (60) |
| Rnd 17 | 4 sc, inc, (9 sc, inc) × 5, 5 sc | (66) |
| Rnds 18–26 | sc around | (66) |
| Rnd 27 | 4 sc, dec, (9 sc, dec) × 5, 5 sc | (60) |
| Rnds 28–29 | sc around | (60) |
| Rnd 30 | (8 sc, dec) × 6 | (54) |
| Rnds 31–32 | sc around | (54) |
The body should grow clearly wider by round 17, stay wide through round 26 and start to narrow from round 27.
Eyes
Colour D (Dark brown). The penguin has no mouth or cheeks. Fasten the ends securely inside the body.
| 1. | Choose the front. Centre the eyes on rounds 12 and 13, with about 8 stitches between their inner edges. | |
|---|---|---|
| 2. | Bring the yarn out at the bottom of the eye and go in one round above. Go through the same two points 3 or 4 times to make a small upright oval. | |
| 3. | Repeat for the other eye. They should match in size and height and be the same distance from the centre. |
Close the body
Colour A (Dark grey). Carry on from round 33. After round 38, start stuffing, and add most of it after round 40. Keep the top round, the middle a little wider and the bottom gently narrowing. Do not overstuff it into a ball. Check it once more after round 41. After round 42, cut the yarn leaving about 20 cm, take it through the front loops of the 6 stitches, from the hole outwards, and pull to close. Hide the end inside.
| Rnd 33 | 3 sc, dec, (7 sc, dec) × 5, 4 sc | (48) |
|---|---|---|
| Rnd 34 | (6 sc, dec) × 6 | (42) |
| Rnd 35 | sc around | (42) |
| Rnd 36 | (5 sc, dec) × 6 | (36) |
| Rnd 37 | 2 sc, dec, (4 sc, dec) × 5, 2 sc | (30) |
| Rnd 38 | sc around | (30) |
| Rnd 39 | 1 sc, dec, (3 sc, dec) × 5, 2 sc | (24) |
| Rnd 40 | (2 sc, dec) × 6 | (18) |
| Rnd 41 | (1 sc, dec) × 6 | (12) |
| Rnd 42 | dec × 6 | (6) |
Belly
Colour B (Cream). A flat disc with no stuffing. Cut the yarn leaving about 35 cm.
| Rnd 1 | 6 sc in MR | (6) |
|---|---|---|
| Rnd 2 | inc × 6 | (12) |
| Rnd 3 | (1 sc, inc) × 6 | (18) |
| Rnd 4 | (2 sc, inc) × 6 | (24) |
| Rnd 5 | 1 sc, inc, (3 sc, inc) × 5, 2 sc | (30) |
| Rnd 6 | (4 sc, inc) × 6 | (36) |
| Rnd 7 | 2 sc, inc, (5 sc, inc) × 5, 3 sc | (42) |
| Rnd 8 | sc around | (42) |
| Rnd 9 | 3 sc, inc, (6 sc, inc) × 5, 3 sc | (48) |
Wing × 2
Colour A (Dark grey). Cut the yarn leaving about 25 cm. Do not stuff the wings. Flatten them, keeping the closed tip round, then sew the 6 stitches on each side of the open edge together.
| Rnd 1 | 6 sc in MR | (6) |
|---|---|---|
| Rnd 2 | inc × 6 | (12) |
| Rnds 3–12 | sc around | (12) |
Beak
Colour C (Orange). A short cone worked from the narrow tip. Cut the yarn leaving about 20 cm. Do not stuff it. Sharpen the tip with your fingers, fold the wide edge in half and sew the 6 stitches on each side together with a few stitches.
| Rnd 1 | 3 sc in MR | (3) |
|---|---|---|
| Rnd 2 | inc × 3 | (6) |
| Rnd 3 | (1 sc, inc) × 3 | (9) |
| Rnd 4 | (2 sc, inc) × 3 | (12) |
Foot × 2
Colour C (Orange). Cut the yarn leaving about 20 cm. Do not stuff the feet. Flatten each one, sew the 6 stitches on each side of the open edge together with short stitches, then shape it into an oval with your fingers.
| Rnd 1 | 6 sc in MR | (6) |
|---|---|---|
| Rnd 2 | inc × 6 | (12) |
| Rnd 3 | sc around | (12) |
Assembly
| 1. | Belly: line the centre up with the front centre of the body, with the top edge around rounds 17 and 18 and the bottom edge running down towards the narrowing part. Leave some of Colour A showing between the eyes and the belly. Pin it and sew around with small stitches. You can ease it very slightly longer as you sew, but do not stretch it or the stitches will distort. | |
|---|---|---|
| 2. | Wings: set them on the sides of the body around rounds 17 to 20, at the same height, with the tips pointing down and the front edges clear of the belly. Sew the top edge firmly and leave the lower tips free. | |
| 3. | Beak: set it halfway between the eyes, with the wide edge just below them around rounds 15 and 16 and the tip pointing down and slightly forward. Sew the wide edge and the top of the beak to the body. It should stay slightly raised, not flat. | |
| 4. | Feet: hold the penguin upright. On the lower front, around rounds 35 to 38, set the feet with 3 to 4 stitches between them and the round ends reaching forward. Sew the back edges to the body. | |
| 5. | Stand the penguin on a flat surface. Check that everything is even, shape the egg with your fingers, hide all the ends and pull gently on each part to test it. |
These places are only a suggestion. Set the wings higher, turn the feet outwards or move the eyes closer together to give your penguin its own character. Pin everything first, look at it, then sew.
If something looks off
| • | The body is too round: it may be overstuffed. Spread the stuffing evenly, especially at the top and bottom. | |
|---|---|---|
| • | The belly puffs up: it should have no stuffing. Seat the edges evenly on the body as you sew. | |
| • | The wings sit at different angles: check that both are on the same rounds. | |
| • | The beak looks flat: shape the narrow tip forward with your fingers. | |
| • | The feet do not show: sew them a little further forward. | |
| • | It will not stand up: an egg shape does not always stand on its own, so adjust the feet to support it and check the stuffing. |